LATEST EXPEDITIONS
How to change Apple ID
How DO I Change Apple ID on My iPhone?
What a Problem! If you go to Setting up your Mac, iPhone or iPad, and it demands your Apple ID. The beginning goes wrong and It so difficult to generate a new Apple ID or changing is show difficult old one to a new email address. Rest assured and breathe deeply: In this Given article, we discuss how to change apple id So you can start Mac or iPhone.
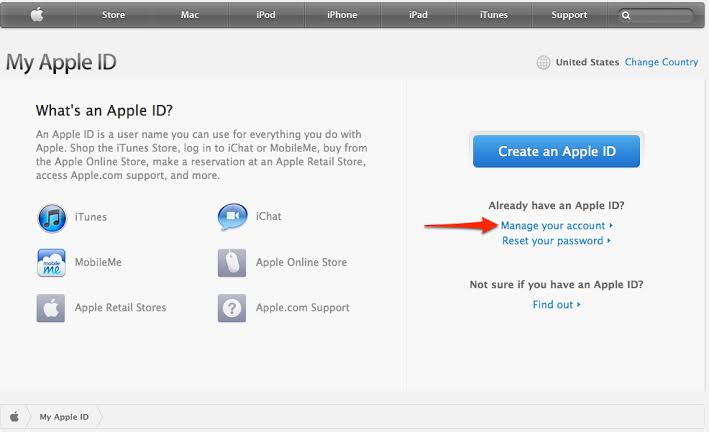
Also, a good little help article available on the Apple website. If you have already available apple id
and password then you can Successfully log in on the 'My Apple ID' webpage, and that the email address you are changing it to is not already in use.
In this article easy to compare to your Apple ID Email Address for a process that's so easier than Apple's. But this is not probable you are here. one of the given reason to you is here one reason.
You are deciding to change your current Apple ID to a new email address.
If you want to try to create a new Apple ID but your Mac or iPhone says 'That email address is already used as an Apple ID' then you have no concept what is my password and you just a create a start fresh.
Then you had Apple ID and you do not remember what is password.
Maybe it happens sometimes.
Some on worked in apple Store has seen this mays time as like 1000 times or more. One of two reasons happen.
A new customer will be set up or create a new Mac, iPad, or iPhone and then go to setting and creating an Apple ID. After that fill in all their information, press ok, and it does not work.
An old Apple customer is trying to change their Apple ID from an old email address to a new one. that customer tries to how to update it, then Mac tells them these email address is already in use.
What a Problem! If you go to Setting up your Mac, iPhone or iPad, and it demands your Apple ID. The beginning goes wrong and It so difficult to generate a new Apple ID or changing is show difficult old one to a new email address. Rest assured and breathe deeply: In this Given article, we discuss how to change apple id So you can start Mac or iPhone.
Also, a good little help article available on the Apple website. If you have already available apple id
and password then you can Successfully log in on the 'My Apple ID' webpage, and that the email address you are changing it to is not already in use.
In this article easy to compare to your Apple ID Email Address for a process that's so easier than Apple's. But this is not probable you are here. one of the given reason to you is here one reason.
You are deciding to change your current Apple ID to a new email address.
If you want to try to create a new Apple ID but your Mac or iPhone says 'That email address is already used as an Apple ID' then you have no concept what is my password and you just a create a start fresh.
Then you had Apple ID and you do not remember what is password.
Maybe it happens sometimes.
Some on worked in apple Store has seen this mays time as like 1000 times or more. One of two reasons happen.
A new customer will be set up or create a new Mac, iPad, or iPhone and then go to setting and creating an Apple ID. After that fill in all their information, press ok, and it does not work.
An old Apple customer is trying to change their Apple ID from an old email address to a new one. that customer tries to how to update it, then Mac tells them these email address is already in use.
What you need to know before you Begin
Different Accounts whit Different Passwords
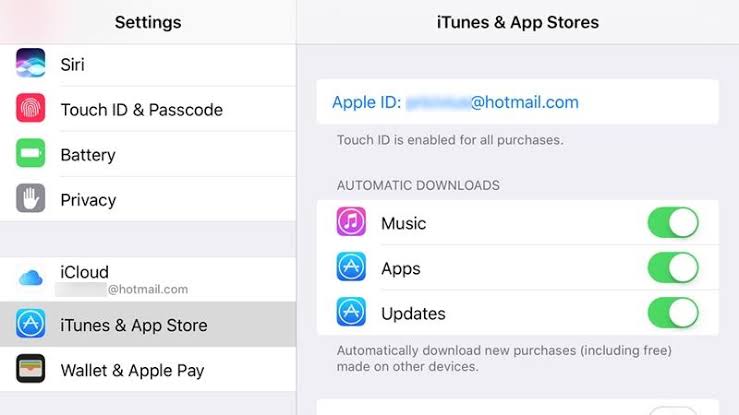
Apple IDs are continually linked with an email address, but the Apple ID and the email address are connected with the proper separate password. It's maybe confusable because both user names are the same (for example, [email protected]) but both accounts are separate. The Only difference is if you will create a new email id in iCloud Email address (ends in @icloud.com) when you create your Apple ID.
In this word: If you know your Email password, but you Apple ID Password may be fully Different. Maybe in this same, but only if set them up that way where you created both accounts.
Firstly, you conformed your an email ID and Apple ID linked together.
Apple sends a confirmation email to the new Apple ID's Email address as the initial part of the setting process. In case you have received verification link email but you not verify it then you will not able to use this Apple ID.
For Example, If you are choosing an Apple ID for [email protected], make conform you log in to [email protected] on the Yahoo! Mail website then after you proceed. Memorize, both are same they have the same user name ( the Email address), but both accounts are different password.
If you failed How to change Apple ID in this procedure flowing the guide. please contact us for further assistance for Change Apple ID.
Different Accounts whit Different Passwords
Apple IDs are continually linked with an email address, but the Apple ID and the email address are connected with the proper separate password. It's maybe confusable because both user names are the same (for example, [email protected]) but both accounts are separate. The Only difference is if you will create a new email id in iCloud Email address (ends in @icloud.com) when you create your Apple ID.
In this word: If you know your Email password, but you Apple ID Password may be fully Different. Maybe in this same, but only if set them up that way where you created both accounts.
Firstly, you conformed your an email ID and Apple ID linked together.
Apple sends a confirmation email to the new Apple ID's Email address as the initial part of the setting process. In case you have received verification link email but you not verify it then you will not able to use this Apple ID.
For Example, If you are choosing an Apple ID for [email protected], make conform you log in to [email protected] on the Yahoo! Mail website then after you proceed. Memorize, both are same they have the same user name ( the Email address), but both accounts are different password.
If you failed How to change Apple ID in this procedure flowing the guide. please contact us for further assistance for Change Apple ID.
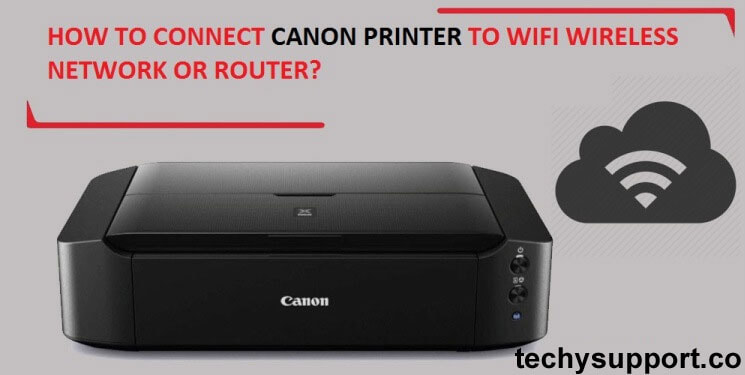
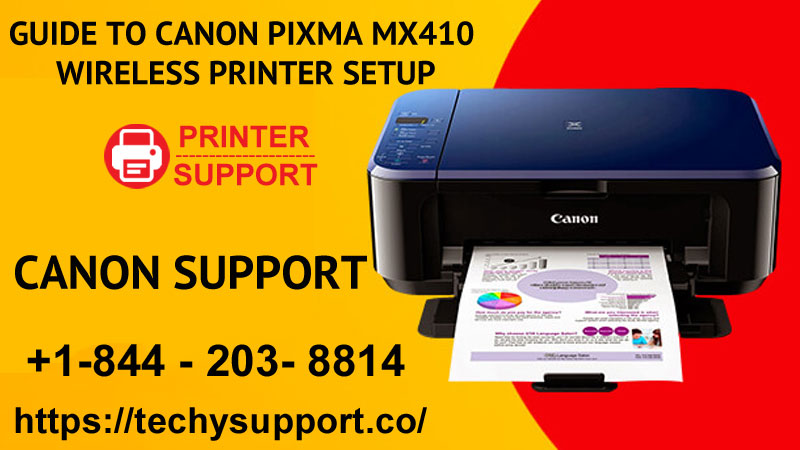
How can I SET UP CANON WIRELESS PRINTER?
Guide for Configure Canon Printer.
Some router and hubs are available Access points. In this router and hub is feature an automatic link Button labelled 'WPS' provides the Wi-Fi Protected Setup.
In this type of router and hub are provide the facilities to connect PIXMA Printer to your network. Without and password required and easily enable it your connectin your device.
you can use this method and connect PIXMA Printer easily. So If your access point has available in your router device use WPS button. You can use this method please select 'WPS Connection Method' flow the given below instruction.
In case of your access point does not Support WPS Please flow another option is given below. you to connect your PIXMA Printer to flow this 'Standard Connection Method' below.
Method to connection WPS
There are some rules you must flow before you start to must be met to use the WPS push button method:
In this router, the access point has to physical WPS push button available. Sure please check your device's in the user manual.
If you do not find the push button please flow the given "Standard Connection method".
You must be using WPA2 security or WPA ('Wi-Fi Protected Access') protocol. Mostly enabled access points to use this protocol.
Step 1: You firstly sure the Printer is turned on.
Please press and hold the (wi-fi) key on the top of the printer until the alarm lamp flashes once.
Step 2: You must be sure in this lamp next to this key starts to blue flash and you go to your access point and press the WPS Key within 2 minutes.
How to access WPS On your access point. please see this details in your user manual.
In the blue wi-fi lamp on the printer will find the network is continuing flashing, its search, and wi-fi and power will flash again and again when connecting to the access point.
and next to, your printer and wifi network made a connection successful. the power lamp and wifi lamp will stop flashing and remain it.
Confirmation your network setting
after that, your printer has successfully connected that your wireless network is able to print. you can take the print out the network settings of your wireless printer.
1. If you first confirm your printer is turned on.
2. Then you confirm the Load the sheets of A4 or your required size of plane paper.
3. You wait for the 15 times alarm lamp flashes to Press and hold the (Cancel/Resume) key. and after that release it. Next to the network information page will be printed.
In the discussion about the printout, you sure check the 'Connection' indicates "Active" and that you can set the SSID Service Set Identifier (name of your wireless network) and Specify the correct name of your wifi network.
This ends the WPS Settings mode.
If you take the highest benefits of software next to makes the most out of your 'PIXMA MG3540'.
If you have no Installation CD avail on this related product. To continue this process you must be download software to continue it.
If you failed WPS wireless in this procedure flowing the guide. please contact us for further assistance for Canon Wireless Printer Setup.
How to Disable Flash Player on Mac
Here given Step-by-Step Two Quick Ways to Uninstall Adobe Flash Player on Mac.
In your Mac, Are you tired seeing these types of Update? Some users Mac Adobe asks you to download and install an update to Flash Player because of some updates and significant improvements in new updates?
Long-time ago, Adobe gave good news for Adobe flash players user to a major security vulnerability, In this discovered by Trend Micro and Reported BGR. In these not to complete attackable or compete secure. because of Abode time to time updates, the software and app and the new version of Flash player software and app are launches.
If you want to Update Mac to some Clicks follow these steps and easily you How to Disable Flash Player on Mac. In this process is boring and more time taken unnecessarily. In Old Days we had to use Adobe Flash Player to view netting Videos as these are mostly inscribed in Adobe's proprietary Related Flash Setup.
No those were the old days, In this 21st centuries there are many moderns browsers are available on the Internet as Chrome, Firefox, Safari and so on. YouTube, Dailymotion, Vimeo, and So many other live streaming netting services. So leave the table run out, the flash player.
So, If you want to cancel your Adobe Flash Player from your Mac so you uninstall flash player. You won't be concerned about your self-updates and potential security issue.
Read in this article, How to Disable Flash Player on Mac.
Note: two methods are showing below in solve it.
Method 1: Uninstall Adobe Flash Player Manager.
Here, we are providing the details of Flash player version 29 in related on Mac OS High Sierra. Maybe your running old version of Mac OS or running outdated version of Adobe Flash, So Minor changes may apply.
Step 1: Go to Mac your Application Services and find this app "Adobe Flash Player Install Manager". Hit to run it.
Otherwise, you can use the quick search on the spotlight and select the 'TOP HIT' result.
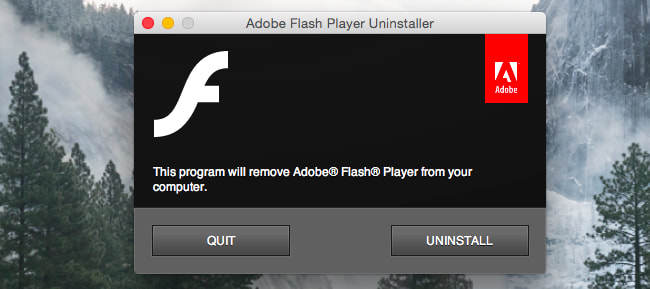
Step 2: After that hit the Uninstall tab in the new window called "Adobe Flash Player Uninstaller" then it says you will remove Adobe Flash Player in your computer.
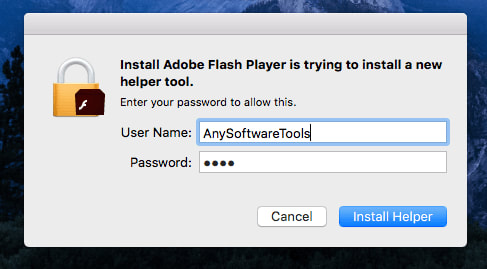
Step 3: you will be using Mac user name and password to help of install helper in your Mac. Myself it's very painful to say to you but no option is available to avoid installing the Adobe helper tool.
Note: In this tool is harmless by adobe in Helper tool. It's general for a third-party app like Microsoft or Adobe to allow permission to ask the certain tasks in any removing items with particular permission to complete a task such as remove it. such as Mac App Store etc. as macOS has many limits to restrictions on this.
Step 4: Done it. After that, a new pops up windows you give the message it Flash was removed from your computer.
This is a good and recommended way to removed flash in your Mac. It should take complete the task less a minute to complete. you uninstall Flash Player, you end up with installing another Adobe application as like Helper tool.
Some Mac user is told to us it's not able to uninstall Adobe Flash Player application. it's not clear to cause of the problem. But In this
Method 1 did not work your problem solve, try to
Method 2. For more information and read
Method 2 visit our website to know How to Disable flash player on mac
In your Mac, Are you tired seeing these types of Update? Some users Mac Adobe asks you to download and install an update to Flash Player because of some updates and significant improvements in new updates?
Long-time ago, Adobe gave good news for Adobe flash players user to a major security vulnerability, In this discovered by Trend Micro and Reported BGR. In these not to complete attackable or compete secure. because of Abode time to time updates, the software and app and the new version of Flash player software and app are launches.
If you want to Update Mac to some Clicks follow these steps and easily you How to Disable Flash Player on Mac. In this process is boring and more time taken unnecessarily. In Old Days we had to use Adobe Flash Player to view netting Videos as these are mostly inscribed in Adobe's proprietary Related Flash Setup.
No those were the old days, In this 21st centuries there are many moderns browsers are available on the Internet as Chrome, Firefox, Safari and so on. YouTube, Dailymotion, Vimeo, and So many other live streaming netting services. So leave the table run out, the flash player.
So, If you want to cancel your Adobe Flash Player from your Mac so you uninstall flash player. You won't be concerned about your self-updates and potential security issue.
Read in this article, How to Disable Flash Player on Mac.
Note: two methods are showing below in solve it.
Method 1: Uninstall Adobe Flash Player Manager.
Here, we are providing the details of Flash player version 29 in related on Mac OS High Sierra. Maybe your running old version of Mac OS or running outdated version of Adobe Flash, So Minor changes may apply.
Step 1: Go to Mac your Application Services and find this app "Adobe Flash Player Install Manager". Hit to run it.
Otherwise, you can use the quick search on the spotlight and select the 'TOP HIT' result.
Step 2: After that hit the Uninstall tab in the new window called "Adobe Flash Player Uninstaller" then it says you will remove Adobe Flash Player in your computer.
Step 3: you will be using Mac user name and password to help of install helper in your Mac. Myself it's very painful to say to you but no option is available to avoid installing the Adobe helper tool.
Note: In this tool is harmless by adobe in Helper tool. It's general for a third-party app like Microsoft or Adobe to allow permission to ask the certain tasks in any removing items with particular permission to complete a task such as remove it. such as Mac App Store etc. as macOS has many limits to restrictions on this.
Step 4: Done it. After that, a new pops up windows you give the message it Flash was removed from your computer.
This is a good and recommended way to removed flash in your Mac. It should take complete the task less a minute to complete. you uninstall Flash Player, you end up with installing another Adobe application as like Helper tool.
Some Mac user is told to us it's not able to uninstall Adobe Flash Player application. it's not clear to cause of the problem. But In this
Method 1 did not work your problem solve, try to
Method 2. For more information and read
Method 2 visit our website to know How to Disable flash player on mac
Dell Support Assist not working

If you know dell Support Assist Monitor and check your computer hardware health. Other software as well as your computer. and this tool is most important and useful your Dell computers, but Some Dell User can encounter ‘Dell Support Assist not working‘. If your Device is facing this types of issue you read this article and fix it easily. You can
be completing all Step you will be able to solve this issue in easily in your own.
How to fix it Dell Support Assist not working Error.
If you want to solve these types of issue flow this given some step to fixes troubleshoots this type of particular error in your device.
Step 1: Delete all the files and Uninstall Support Center
If you want to Settle in these types of fault, firstly Unistal the Dell Support Center from your computer or device. Otherwise, delete all files and folder in your device related to Dell Support Assist or Dell Support Center. Follow Some step to solving this Issue given in these perfect action:
1. Firstly you use key bord and hold ‘windows logo’ key + ‘R’ and launch the Run Dialogue box.
2. After that opened Run dialogue box, and type “appwiz.cpl” and click or hit Enter and another window are appear then open the Programs and Features option.
3. Then after you go to the Dell Support Center and Dell Support Assist.
4. First done, Dell Support Center or Dell Support Assist right-click and do this.
5. At the Moment, Select the option.
6. You steel waits until your computer or device finishes the removing procedure of Dell Support Assist or Dell Support Center.
7. First done, hold the Windows logo key as well as the E button to reopen the Windows Explorer and File Explorer.
8. See the right side of windows, and tap to My Computer section or PC.
9. Now, You go to C Program files and remove or delete it the name of Dell Support Assist and Dell Support Center.
10. Then after, Go to C drive and find location name C:\Users\*YOUR USERNAME*\AppData\Local\Temp and removing all files and folder Temp.
11. After done, In C drive go to the section with is C:\Users\*YOUR USERNAME*\AppData\Roaming and remove PCDR folder.
Then after once done, Restart your Windows device. then after you will be able to solve this issue on your own.
Step 2: Do Restore your Device Or Computer
1. If you can able and solve this issue firstly perform a system restore process in your dell device in another way to resolve this particular error. in this instance, Flow this given step in below:
2. Firstly, find it Cortana section the Windows 10 Device.
Find it, and tap on the Create a restore point section.
3. Done it, you easily see the system properties your computer or devices will begin containing and appearing the settings in the restore point. In this computer window, Next, you go to Protection Setting and Enabled it in the Local Disk C (Computer Drive).
4. If you see disable notice it, after that, you have to choose that disk as fine and tap Configure tab and enable it.
5. Then after, You have to full access to allocate the maximum disk space and allow it System Protection.
6. you have set it as per your requirement.
7. Then after, You tap to apply option and choose hit OK Option to apply changes.
8. After that, you always find the changes in your device whenever. your computer or device will be creating a restore point automatically.
Then after check you Error Status. It is found, try to another method it’s given it.
Step 3: Reinstall Windows Operating System
If your problem is not to be solved. firstly backup your device data in an external Device. Reinstall your Computer or Device. Then after Installed Drivers and Software.
If your problem is not solved. you contact our Dell Support Assist not working Technical Support Number a certified technician can help you and find your eject problem, issue and solve.
The certified technician solves problems in several minutes.

AMUR TIGEREdit this text to make it your own. To edit, simply click directly on the text to start adding your own words. |

INDIAN RHINO You can move the text easily by dragging and dropping the text anywhere on the page. |

POLAR BEAREdit this text to make it your own. To edit, simply click directly on the text to start adding your own words. |
Edit this text to make it your own. To edit, simply click directly on the
text and start typing. You can move the text by dragging and
dropping the Text Element anywhere on the page. Break up your text with more
than one paragraph for better readability.
text and start typing. You can move the text by dragging and
dropping the Text Element anywhere on the page. Break up your text with more
than one paragraph for better readability.
OUR GOALOur animals are disappearing. We're changing that. |
First Let'sDiscover
Some days a motivational quote can provide a quick pick-me-up for employees and even management. They can be a breath of fresh air when it comes to a drab afternoon. These are also a great way to jazz up a newsletter or memo.
|
Now let's WORKConserve
Some days a motivational quote can provide a quick pick-me-up for employees and even management. They can be a breath of fresh air when it comes to a drab afternoon. These are also a great way to jazz up a newsletter or memo.
|
IT'S UP TO USChange
Some days a motivational quote can provide a quick pick-me-up for employees and even management. They can be a breath of fresh air when it comes to a drab afternoon. These are also a great way to jazz up a newsletter or memo.
|
