|
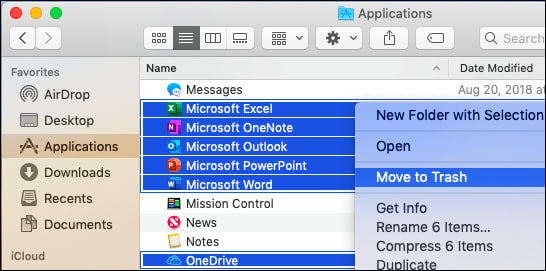
If you success full install Microsoft Office 365 in your computer, If you uninstall Microsoft Office 365 there is a lot of reason. Maybe, If you are an attempt to Set free up an excess of Office 365 to any other computer or device, perhaps not working properly and you are attempting to reinstall the software to correct any issues, you only do not equally product and then you try to run down to older or previous version or you try to uninstall it always. I don't know what is the reason, there are some ways to uninstall Microsoft Office 365 from your device or computer. In this article, you will do the How to Uninstall Microsoft Office 365? quickly from your device or computer.  Method 1: Uninstall Office 365 from Windows 10 through Settings. Flow these steps to uninstall Microsoft Office from Windows 10 through Setting given below. 1. Go to Setting 2. Select on Applications and Features. 3. chose the Microsoft Office 365 installation, or chose an option suite of a name like Microsoft Office Home, or Microsoft Office 365 and Student 2019. 4. Hit the Uninstall Tab. 5. Hit the Uninstall Tab again. 6. After that, you complete this task with continuing on-screen directions. you complete in these steps, then your device or computer the suite of Office application will not be available. In another option, On older version of the Operating System (OS), Go to Control Panel and select Program and Features select Uninstall Microsoft Office 365 or suite. How to Uninstall Microsoft Office 365 completely using the easy fix tool. You will be using an easy fix tool and fastly you speedily uninstall Microsoft Office 365, Office 2013, or Office 2016 from your computer in this facilities provided by Microsoft. Flow these steps to 'Uninstall Microsoft Office 365' using to tool: 1. Firstly you Download Office easy fix tool through Microsoft. 2. After that, you launch the tool double click the file. 3. Hit the Next tab. 4. Select Yes to perfectly uninstall the suite of Microsoft Office apps from your computer. Microsoft Office should be permanently removed from your computer, after that, you can flow on reinstalling Microsoft Office 365 from your Microsoft Office Online account or step by step manually install Microsoft Office 2016. You can not uninstall single or individual applications anymore according to worth pointing. As like Exel or Word, Using Microsoft Office 365. and how to we do remove an individual application. It does easily than you buying the standard version of the suite. Method 2: How to Uninstall Office 365 from Mac. You flow these steps to easily uninstall Office from your Mac Computers such as Exel, Word, PowerPoint, Outlook and OneNote. Firstly you Signed in as admin on your Mac using user name and password to complete these steps. Remove Office from your Mac apps. 1. Firstly Open Finder select applications. 2. Command +click to chose all of the Office for Mac apps. 3. Ctrl+hit apps you select and hit Move to Trans. Go to Library folder and delete files from your user 1. Go to Finder, press Command +shift+g. 2. Appear in these windows, enter ~/Library after hit Go. 3. Go to the Containers folder and ctrl+click here move all folders to Trans. 4. After that go back to Library folder use the back arrow and open Group Containers. Ctrl+click move all folder to Trash. Delete from Dock and restart 1. If you put Select each one Office apps your Dock and ctrl + click Option Delete from Dock. 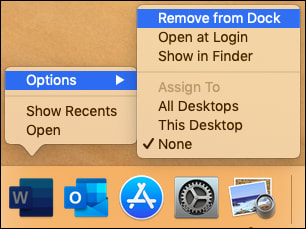 2. After that, you restart your Mac to permanent Uninstall.
If you failed to How to Uninstall Microsoft Office 365? please contact us for further assistance.
0 Comments
If you use Apple online services you required an Apple ID, In this Apple ID you use Mac, iPad or iPhone. it's very simple. How to Create an apple id?  You can not access all services of Apple services and products without the help of an Apple ID. Happily, it is very simple to create one. In this article, we discuss here how to create an Apple ID for anyone or a child, as sensible with set up strong security and attach Family Sharing group. For more details on Apple ID account setup, read How to change an Apple ID and How to use an Apple ID account. Firstly go to Apple website and Visiting Apple's ID part then after clicking and Create An Apple ID. https://appleid.apple.com use in this link and flow the instruction and easily creating Apple IDs on the web portal and manage it. It is not required Apple ID to link Apple product. If anyone allowing to create an Apple Account or you are windows user or Linux user. You get a free iCloud account to limited access in you use to online versions of Keynote, Page, Numbers and your have 1GB of Free iCloud storage to boot. But, aside from using this storage space from the foregoing web-based apps, you are not able to access another way for example, through the iCloud Windows for Windows app - need first you link the Apple ID to an iOS or Mac device by signing. Limited accessing online iWork tools. Without you do not link your Apple ID to Mac or iOS device. Then you want full access iWork tools to link it.  you creating for Apple Id. have provided an email address for your username. But you know this is not existing email account that's given by Apple, and it is not truly previously used for an Apple ID.
Do not provide wrong details because a verification mail will be sent to your email address, and you open first you verify the given link in your email address after that you able to log in Apple ID opened for business. Next, in case of your application in down in future, you have required another email address for secure your account for resetting your password. In this email address, less use or rarely and this way use Apple ID. You could give the email address of your family member, as well spouse. Verify this email address using a verification link. Provide the date of birth to create on Apple ID, fill in all details and security questions, and provide your mailing address. Do not fill any false information because Apple will be using your all the details again conformation. Correct ways, you Provide the correct country and enter details seeing that Apple runs various programs separately Movie, Music and App Stores for apart region. If you live in Antigua but you provide Birmingham then it will difficult when you will provide details of credit card details to purchases. your billing address is different. you will be limited to selling through Birmingham's local iTunes and Apps Stores. If you failed to create new Apple ID in this procedure flowing the guide. please contact us for further assistance for Change Apple ID. Here given Step-by-Step Two Quick Ways to Uninstall Adobe Flash Player on Mac. In your Mac, Are you tired seeing these types of Update? Some users Mac Adobe asks you to download and install an update to Flash Player because of some updates and significant improvements in new updates? Long-time ago, Adobe gave good news for Adobe flash players user to a major security vulnerability, In this discovered by Trend Micro and Reported BGR. In these not to complete attackable or compete secure. because of Abode time to time updates, the software and app and the new version of Flash player software and app are launches. If you want to Update Mac to some Clicks follow these steps and easily you How to Disable Flash Player on Mac. In this process is boring and more time taken unnecessarily. In Old Days we had to use Adobe Flash Player to view netting Videos as these are mostly inscribed in Adobe's proprietary Related Flash Setup. 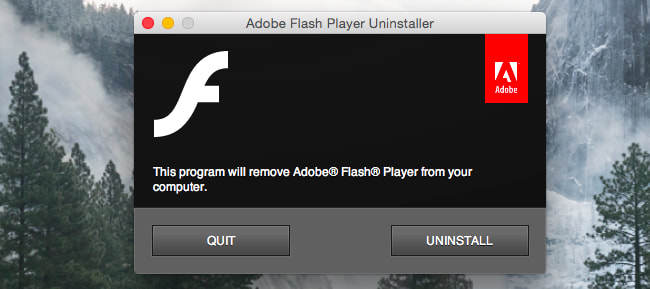 No those were the old days, In this 21st centuries there are many moderns browsers are available on the Internet as Chrome, Firefox, Safari and so on. Youtube, Dailymotion, Vimeo, and So many other live streaming netting services. So leave the table run out, the flash player. So, If you want to cancel your Adobe Flash Player from your Mac so you uninstall flash player. You won't be concerned about your self-updates and potential security issue. Read in this article, How to Disable Flash Player on Mac. Note: two methods are showing below in solve it. Method 1: Uninstall Adobe Flash Player Manager. Here, we are providing the details of Flash player version 29 in related on Mac OS High Sierra. Maybe your running old version of Mac OS or running outdated version of Adobe Flash, So Minor changes may apply. Step 1: Go to Mac your Application Services and find this app "Adobe Flash Player Install Manager". Hit to run it. Otherwise, you can use the quick search on the spotlight and select the 'TOP HIT' result. Step 2: After that hit the Uninstall tab in the new window called "Adobe Flash Player Uninstaller" then it says you will remove Adobe Flash Player in your computer. Step 3: you will be using Mac user name and password to help of install helper in your Mac. Myself it's very painful to say to you but no option is available to avoid installing the Adobe helper tool. Note: In this tool is harmless by adobe in Helper tool. It's general for a third-party app like Microsoft or Adobe to allow permission to ask the certain tasks in any removing items with particular permission to complete a task such as remove it. such as Mac App Store etc. as macOS has many limits to restrictions on this. Step 4: Done it. After that, a new pops up windows you give the message it Flash was removed from your computer. This is a good and recommended way to removed flash in your Mac. It should take complete the task less a minute to complete. you uninstall Flash Player, you end up with installing another Adobe application as like Helper tool. Some Mac user is told to us it's not able to uninstall Adobe Flash Player application. it's not clear to cause of the problem. But In this Method 1 did not work your problem solve, try to Method 2. For more information and read Method 2 visit our website to know How to Disable flash player on mac 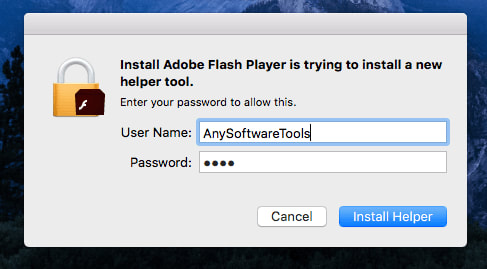 If you know dell Support Assist Monitor and check your computer hardware health. Other software as well as your computer. and this tool is most important and useful your Dell computers, but Some Dell User can encounter ‘Dell Support Assist not working‘. If your Device is facing this types of issue you read this article and fix it easily. You can be completing all Step you will be able to solve this issue in easily in your own. How to fix it Dell Support Assist not working Error. If you want to solve these types of issue flow this given some step to fixes troubleshoots this type of particular error in your device.  Step 1: Delete all the files and Uninstall Support Center
If you want to Settle in these types of fault, firstly Unistal the Dell Support Center from your computer or device. Otherwise, delete all files and folder in your device related to Dell Support Assist or Dell Support Center. Follow Some step to solving this Issue given in these perfect action: 1. Firstly you use key bord and hold ‘windows logo’ key + ‘R’ and launch the Run Dialogue box. 2. After that opened Run dialogue box, and type “appwiz.cpl” and click or hit Enter and another window are appear then open the Programs and Features option. 3. Then after you go to the Dell Support Center and Dell Support Assist. 4. First done, Dell Support Center or Dell Support Assist right-click and do this. 5. At the Moment, Select the option. 6. You steel waits until your computer or device finishes the removing procedure of Dell Support Assist or Dell Support Center. 7. First done, hold the Windows logo key as well as the E button to reopen the Windows Explorer and File Explorer. 8. See the right side of windows, and tap to My Computer section or PC. 9. Now, You go to C Program files and remove or delete it the name of Dell Support Assist and Dell Support Center. 10. Then after, Go to C drive and find location name C:\Users\*YOUR USERNAME*\AppData\Local\Temp and removing all files and folder Temp. 11. After done, In C drive go to the section with is C:\Users\*YOUR USERNAME*\AppData\Roaming and remove PCDR folder. Then after once done, Restart your Windows device. then after you will be able to solve this issue on your own. Step 2: Do Restore your Device Or Computer 1. If you can able and solve this issue firstly perform a system restore process in your dell device in another way to resolve this particular error. in this instance, Flow this given step in below: 2. Firstly, find it Cortana section the Windows 10 Device. Find it, and tap on the Create a restore point section. 3. Done it, you easily see the system properties your computer or devices will begin containing and appearing the settings in the restore point. In this computer window, Next, you go to Protection Setting and Enabled it in the Local Disk C (Computer Drive). 4. If you see disable notice it, after that, you have to choose that disk as fine and tap Configure tab and enable it. 5. Then after, You have to full access to allocate the maximum disk space and allow it System Protection. 6. you have set it as per your requirement. 7. Then after, You tap to apply option and choose hit OK Option to apply changes. 8. After that, you always find the changes in your device whenever. your computer or device will be creating a restore point automatically. Then after check you Error Status. It is found, try to another method it’s given it. Step 3: Reinstall Windows Operating System If your problem is not to be solved. firstly backup your device data in an external Device. Reinstall your Computer or Device. Then after Installed Drivers and Software. If your problem is not solved. you contact our Dell Support Assist not working Technical Support Number a certified technician can help you and find your eject problem, issue and solve. The certified technician solves problems in several minutes. |
AuthorWrite something about yourself. No need to be fancy, just an overview. Archives
July 2020
Categories |
 RSS Feed
